
What is CSS?
CSS is short for Cascading Style Sheets
CSS is simple – once you know how to use it … But what is CSS? CSS is part of HTML, and HTML is the programming language that forms the basis of the internet and all websites. Almost everyone who is interested in creating a website knows that. However, basic HTML only has a limited number of options for designing a web page. That is why an extra programming language has been created that considerably increases these options; That is CSS, and it is a part of HTML now.
CSS can be applied
- In a stylesheet
- Per object
- Per page
- In the ‘extra CSS’ page of a WordPress theme
- Code in a snippet manager
A style sheet is a small file that the browser reads so that it can display the website or specific pages in a certain way.
Per object. This means that the web builder (designer) adds a small piece of code to a specific object, such as an illustration (block) or text (block), which changes the representation of that object.
Per page. Some Page builders enable you to place CSS on a specific page. The code then only influences elements (blocks) that are on that one page.
Extra CSS-page of a theme (almost every theme offers one). A web designer can add certain functionalities to the site, or to show certain objects differently, than the theme usually does. This can be accomplished by adding the CSS code to the Extra CSS page.
Code in a snippet manager. A snippet manager is typically a plugin. Every kind of code, PHP and CSS can be saved within the snippet manager. The advantage is that the code is saved in a way that is not depending on the theme; even when you switch the theme, the code is still there.
CSS as an addition
We are not going to discuss CSS as a complete style sheet; people who have already mastered CSS at that level do not need this explanation, and if you want to learn how to create a complete CSS stylesheet, you need more than we share right now.
Most people, who create a website for a small company or organization, require some CSS code to make small changes to (part of) a website. We explain how to do that.
CSS-code in WordPress – simple applications
- Align a text, a word, or paragraph.
- Change the text style, like bold, italic, etc.
- Illustrations alignment, like center, left, right, above, below, etc.
CSS code for slightly less simple adjustments
- Less or less white space below or above a heading (H1, H2, H3 or H4)
- Code to remove the magnifying glass in WooCommerce. With CSS, you can remove the magnifying glass, which is visible in the image as standard.
- Code to remove the ‘Continue Shopping’ button in the WooCommerce shopping cart. There are circumstances in which you do not want to use that button. With CSS, you can easily remove the ‘Continue shopping’ button.
- Code to give a header on one or more pages a different color or an indentation. With CSS code, you can give certain heads on your page a different color than they would have according to the theme. It can be fun, or make the text easier to read, to have an indent in. That is all possible with CSS.
- CSS Code to ‘grow’ an image optically when hovering with the mouse. You probably know the effect; If you hover your mouse over an image, the image seems to grow. That is a beautiful and civilized effect to make your site more dynamic. The effect is easy to accomplish with CSS code; For one image, or all images.
- CSS Code to hide the related products on WooCommerce. Using related products can be very useful, but is sometimes too busy or inappropriate.
- Code to hide a block (text or image etc.) on a mobile phone.
How do ‘target’ your CSS code to a specific object?
- Code is often aimed at a specific object (block) on a page or site.
- CSS code has a specific syntax (way of writing the code).
CSS syntax
- A selector. A selector is the part of your website or page to which the code applies. That can be a name or a name in combination with an ID, such as a page ID, so that only the page or the part with that ID is targeted.
- There is also a class selector. That means that you apply a class name in the CSS code and assign the same class name to a specific object or multiple objects. That sounds complicated, but you will that it is simple, really.
- After the selector always follows the declaration. The declaration itself consists of a property and a value.
- The CSS code always starts with a . (dot), but you don’t use that when applying a class selector in a block or page.
- The declaration always starts and ends with a { and }.
- Every value in a CSS code always ends with a ; (semicolon).

In addition, you see an example of the syntax of CSS. This example is made by w3schools.com.
H1 means the biggest heading (title) of the page. Color is the property and blue is the value. Colors are usually indicated with some characters, such as #FF6347, but “blue” is also a valid value.
Font-Size is another property and 12px (12 pixels high) is the value. If you put multiple property and values in one piece of code, you have to separate them with one; (semicolon).
Explanation of this example
If you were to put this “in real life” in your extra CSS, the H1 head of each page of your website would turn blue and would have a height of 12 pixels (which is too small for a heading, so don’t do that).
There is a reasonable chance that your theme does not accept this code and “thinks” I just show the H1 head according to the settings I have in my theme. There is also a solution for that. A solution you will often need if you start to apply CSS. It is a way of ‘overriding’ a theme or a specific plugin, like a LMS.
The solution if a CSS code is “refused” by the theme
You would to apply this code, but the result is not visible to the visitor:
h1 {color:blue ; font-size: 12px ; }You change the code by adding !important before the last semicolon. Then the CSS code is like this:
h1 {color:blue ; font-size:12px !important; }Now you have a chance that the font size is 12px, but the text is still not blue. The solution is the same: just add !important after the blue. The CSS code will be:
h1 {color:blue !important; font-size:12px !important; }These were only examples of the syntax of CSS. In the menu, you will find CSS for multiple WordPress related situations.
CSS Class Selector – an explanation
In the example, we shared CSS code for a specific nameable property of the theme, such as a H1 heading: so H1 is the Property on which the CSS code is targeted at. As soon as you apply this code, it changes all the H1 heading on the website.
What frequently happens is that you want to adjust one element, not all of them who share the same selector. Like a specific text block, heading, or image.
You accomplish that by creating a “class”. Almost every theme and every decent Page Builder has the option of not only placing a CSS code in the Extra CSS, but also to assign a class to a block. We’ll explain this in details in the example below.
Example CSS class
Starting point: you want to make a heading red, but only a few headings you choose, not all. You achieve this by using a class; In the example earlier, we used the selector H1. We can’t use that now because it would apply to all H1 headings on the website.
Instead of H1, you make up a name! That name must meet a few conditions:
- The name has to be unique: it cannot be identical to a class used elsewhere on this website.
- Because a theme (and other plugins) also use classes ‘under the hood’, the name shouldn’t be universal; give it a personal touch! For example, start every class you create with your initials.
- The name should be an indication of what it does. If I named a class BB01, and see that name a year later, it wouldn’t tell me what it does. But naming the class bb-head-red, tells me I created the class and that it’s used to create red headings.
Now we are going to write the CSS code
- You start with a dot and the name of the class, in this case .bb-head-red
- Then always a {
- Then the Property, in this case color
- After the property a : (colon) and the value red
- To be certain, we add !important
- After the value and !important we add the ; (semicolon)
- If there is no other property and value, you close the CSS with a }
.bb-head-red {color:red !important; }Put the CSS code on your website

Apply the CSS Class to the block or element
- You open the page or post where you want to adjust the title.
- On the correct page, click Edit.
- Whether this is Kadence Blocks, Greenshift, Divi, Elementor, it works the same with every builder.
- Each element or block of a good builder has a field with advanced or options with the name: ‘Extra CSS classes’
- Type the name of the CSS class you created, but without the . (dot) at the beginning. This is essential. Otherwise, it will not work. That looks like this:
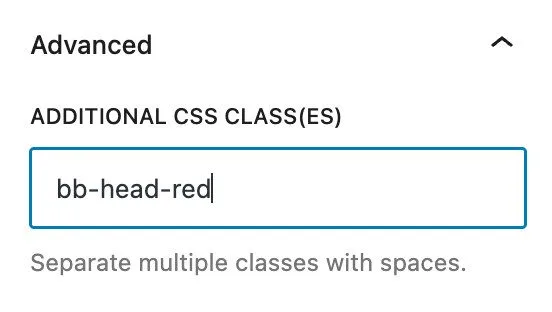
Then click Save so that this added CSS Class is part of your page. Now the H1 heading where you have added the class, will be red.
Tip 1: put instructions in the CSS code
It is useful to put an indication of its use, in every CSS code that you use or save. You put this at the start of the code and place it like this:
/* Give an indication of what the CSS code does */
.bb-head-red {
	color:red !important; }
Tip 2: Store your CSS code somewhere
It is useful to make a note somewhere of the classes you have created, with both the code and the purpose of the code. We keep all codes applied by us in the (free or paid) Upnote app. This note application has the advantage that no graphic layout is applied so that the code can still be used later.
Tip 2: Remember you often don’t see the effects backend
Occasionally, CSS code immediately has a visible effect while editing a post. However, keep in mind that in numerous instances, a lot of CSS code only shows at the frontend; that’s how a visitor sees it.