
Documentation Dynamic Templates & Elements
Documentation for the Dynamic Templates & Elements plugin
Install the Dynamic Templates & Elements plugin
Assign block theme (FSE) templates, headers and footers by post type, specific posts/pages, or category/tag (singular and archives).
Functionality of Dynamic Templates & Elements
- You can assign FSE templates to pages, posts, and custom posts.
- You can assign headers and footers to pages, posts, and custom posts.
- Upload the Dynamic Templates & Elements plugin
- Activate the plugin
- Go to Admin
- Appearance
- FSE template rules
- Provide the license key
Dynamic Templates & Elements settings in short
- Download the plugin
- Activate the plugin
- Go to Admin
- Appearance
- Select the tab you need
Settings license key & tabs
The settings page only contains a few (important) settings.
- License key
- Visible tabs
You can specify which tabs are in use (and therefore visible). Not everyone uses all features. For example, the FSE template rules do not apply to a classic or hybrid theme.
Template assignment is partly conditional
Assigning a template to a post type is not conditional (saved in the targeted posts), but the following assignment types are:
- Taxonomy (such as category or tags)
- Excluding page or post IDs
- Excluding taxonomy by ID or slug
- Visible for logged-in or logged-out or both
- You can deactivate a rule, duplicate it, or just delete a rule.
Copy an FSE template
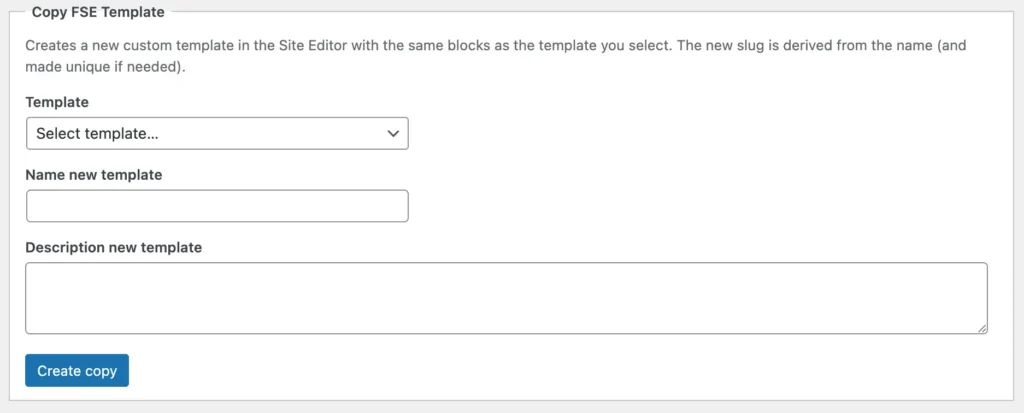
- Go to Appearance, Settings.
- Click on the tab ‘Copy FSE Template’.
- Choose the existing template you wish to copy.
- Provide a new name and a description, and click on Create Copy.
- The success message on top even provides you with a link to edit the newly created template.
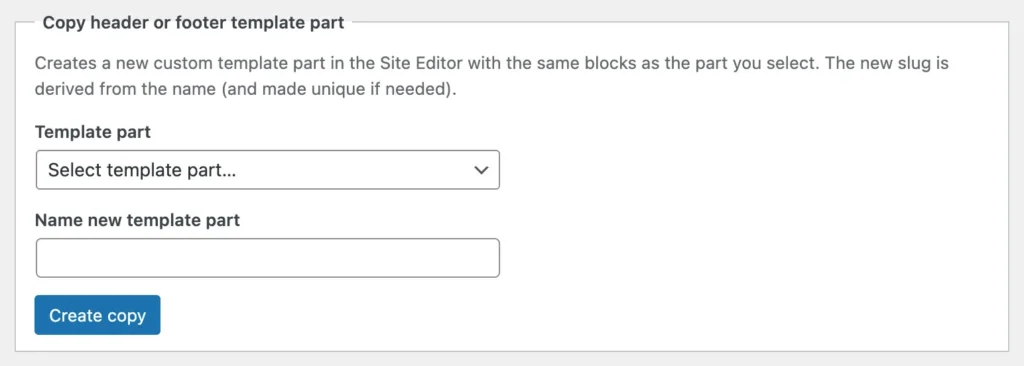
Copy a header or footer
- Go to Appearance, Settings.
- Click on the tab ‘Headers and Footers.’
- Select the existing header or footer you wish to copy.
- Provide a new name and a description, and click on Create Copy.
- The success message on top provides you with the link to edit the newly created template.
Setting a template rule
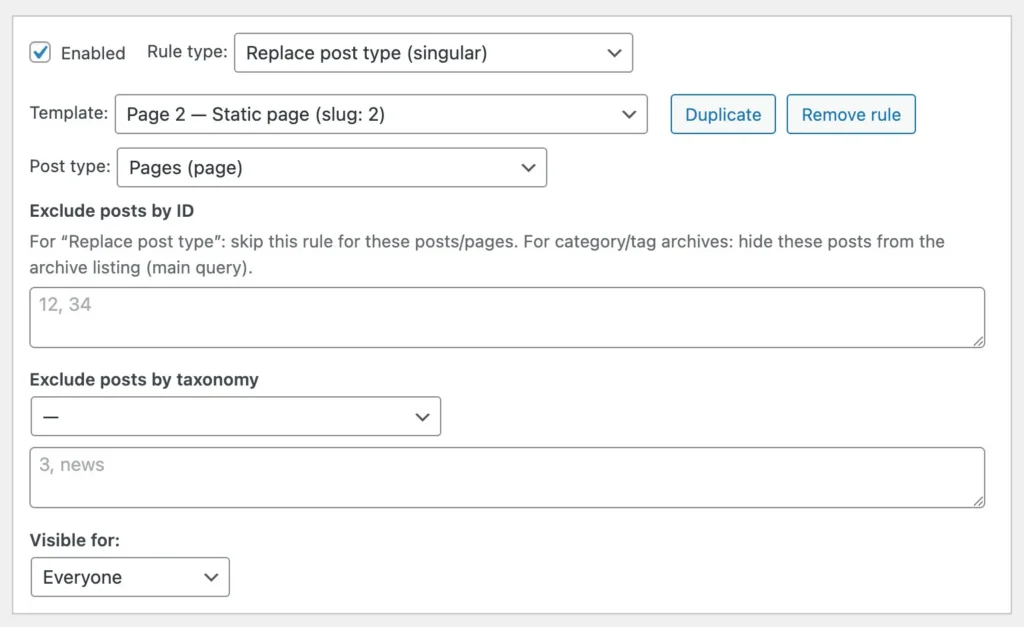
- Setting up an FSE template rule is straightforward.
- In the WordPress admin, go to Appearance → FSE Template Rules, then create your first rule.
- You can delete any rule or duplicate it.
- Excluding posts is always by ID, not by title or slug.
- For taxonomy exclusions, select a taxonomy (e.g. categories or tags), then a term—by ID or slug.
- Visibility defaults to everyone; you can limit rules to logged-in or logged-out users only.
- Note: If you are logged in as an administrator, logged-in versus logged-out visibility may not behave as on the front end for your account; otherwise you could lock yourself out of seeing your content.
- Save when done.
Elements
Dynamic Template & Element offers 4 types of elements.
Note: The Element functionality is completely classic and hybrid theme compatible.
- Standard elements
- Fixed elements
- Post content element
- WooCommerce product content
1) Elements (standard)
- Those elements are template-like elements that don’t replace your page template. It’s a functionality also present in some classic themes like Kadence, GeneratePress and Blocksy.
- Standard elements can serve various purposes, but they are primarily utilized for content that remains hidden until triggered. Consider features like popups, flyout blocks, and forms. These elements can be made available throughout the website, ready to be activated by a button, text, or any other trigger you choose.
- Elements can be used with classic, hybrid and FSE themes.
2) Fixed (floating) elements
- Fixed elements are like standard elements but serve a unique purpose. They are designed for visual components such as buttons, floating buttons, bold text, logos, acknowledgments, social media icons, and more.
- Fixed elements can be used with classic, hybrid and FSE themes.
- The plugin installs a real and usable floating button. At admin / settings / elements you can create a copy and edit it. You can create vertical text for a floating button by adding a class to the extra CSS field in the block settings of the paragraph or heading block. The classes are: topdown or downtop.
3) Post content element
- Post content elements are extremely useful. They provide content to the targeted posts (posts, pages, and custom post types) that don’t replace your page template. It’s a functionality also present in some premium classic themes like Kadence, GeneratePress and Blocksy.
- A post content element only replaces the content part of the targeted post type, so the header and footer remain in place.
- Like any other element, the post content element can be targeted by type, ID, category and tag and has exception functionality.
- Post content elements can be used with classic, hybrid and FSE themes.
Post content element – for all themes
- The Post content element works in principle on all themes.
- Because not all themes adhere to WordPress conventions and come up with unconventional ways to achieve something, the post content element consists of a multi-usage FSE element with special settings for: width none, width wide and the side padding. Those settings are located at Admin, Settings, Dynamic Templates & Elements / Settings, and License.
- The block is intended for posts, pages, and custom post types, not for WooCommerce elements.
4) WooCommerce product content
- This feature solves one of the biggest dilemmas for many developers: how do you create a uniquely designed WooCommerce product page?
- Until now you needed a plugin like Kadence Shop Kit to have this functionality.
- Like any other element, the WooCommerce product content element can target products by type, ID, category and tag and has exception functionality.
- WooCommerce product content can be used with classic and hybrid themes only. FSE themes already have editable product templates.
- Note 1: The WooCommerce product content elements bypass your theme’s default templates. This means that some basic functions work differently. For example, a WooCommerce notification or a sticky add-to-cart feature that you could turn on and off in the customizer and per product. Because the WooCommerce product content element is not recognized natively, those must now be turned off in the customizer.
- Note 2: You can use all WooCommerce blocks supported by your theme. We have no influence on that. However, don’t worry; usually that is all you need.
- Tip: If you want more, the Greenshift WooCommerce blocks work excellently.
Woo product content element – for all themes
- The Woo product content element works in principle on all themes.
- Because not all themes adhere to WordPress conventions and come up with unconventional ways to achieve something, the Woo product content element consists of a multi-usage FSE element with special settings for: width none, width wide and the side padding. Those settings are located at Admin, Settings, Dynamic Templates & Elements / Settings, and License.
- The block is intended for WooCommerce elements, not posts, pages, and custom post types.
WooCommerce product (starter) element template
- The plugin installs a starter element for WooCommerce products.
- To prevent your changes from being lost, the WooCommerce starter template is not updated during an update. If you do want this, remove the WooCommerce starter element before updating our plugin; the latest version will then be installed.
- We recommend always making a copy of the WooCommerce starter template and working with that.
WooCommerce blocks for the product element template
Before you see any block at all, you need to have WooCommerce installed. The exact composition of WooCommerce blocks depends on the theme you are using. Many themes, for example, have their own version of the add-to-cart block and the like.
Those are the WooCommerce blocks for the product page (not all the mentioned blocks are available or necessary). Because you are not working with a ‘standard’ WooCommerce template, most other blocks (heading, paragraph, tabs, accordion, image, video, columns, etc) are also available for you.
You can add the product block; that block contains most of the necessary WooCommerce blocks, so you can use it as a starting point. Or you can add blocks manually, see the list below.
Note: Always place the WooCommerce blocks in a group block (or comparable) to be able to set the correct width.
- Product (contains most necessary WooCommerce blocks)
- Product Title
- Product Price
- Product Summary (short description)
- Product Description (long description)
- Add to cart
- Product Image
- Shop Messages (usually placed on top)
- Product Rating
- Product Meta
- Product Details (compatibility depends on the theme)
- Related Products
- Product Image Gallery (compatibility depends on the theme)
- Product Reviews (depending on the theme)
- On sale badge (always placed within the Product Image block)
- and more
Woo product content is tested on
- Blocksy theme
- Kadence theme
- Woo Product content works with classic themes (FSE themes already have editable WooCommerce templates).
- The element is a blank FSE element with special settings for: width none, width wide and the side padding.
- Default settings are: 740px, 1200px, 1.5rem, clamp(1rem, 4vw, 3rem). Full width always spans the canvas edge-to-edge (past side padding).
- The Woo product element is intended for WooCommerce elements, for pages you use the Post content element.
Element settings
- Assign to post type, singular, archive, specific posts, front-page, category, and tag.
- Exclude posts by ID, and taxonomy.
- Visibility per device (show/hide).
- Visibility based on logged-on status.
Element block settings
- Those settings are available in the block settings when editing.
- Anchor (left, right, bottom-right, bottom-left, top-right, top-left)
- Distance x and y settings.
- Show after a set time in ms.
- Z-index setting.
- Example: To have a floating button on the right, select “right” with a 200 px distance. Leave the x value empty (not zero).
Dynamic post content block
- The Dynamic post content block shows content already present on a post (post, page, or custom post type) in a post element that targets that post type.
- When working with elements and templates, it is actually best to work with custom fields. However, sometimes you also want to be able to display user-placed content. That is what this block is for. You can only place one post content block per element.
Dynamic post content block – how to use
- Place the Dynamic post content block on the page element, wherever you like the user-added content to appear on the page-element.
- It is possible to add the Dynamic post content block surrounded by other blocks, in a column, etc.
- The Dynamic post content block can also be placed in columns, row-block and the group block; just make sure there is enough width for the user-content and partcipate on the unknown height.
Compatibility with elements
We tested the elements functionality on those FSE themes, classic themes and builders.
FSE themes
- Ollie
- Ollie pro
- Neve FSE
- Fork
- Frost
- Greenshift
Classic themes
- Blocksy
- GeneratePress
- Kadence
Block collections / builders
- GenerateBlocks
- Kadence blocks
- Native Gutenberg
- Greenshift
- Stackable
Editing of the Elements
- Elements are created within the Dynamic Templates & Elements settings.

Elements can be found here
- In the admin menu for editing, just like all other post types.
- In editing mode top-right through the Elements icon next to the block settings.
- By opening Dynamic Templates & Elements settings, Elements.
I created an element, but the renderings don’t show my element content
- There are three important steps, and you might have forgotten one of them.
- (1) Create the element (published) (2) It has to be assigned to a post type, post ID, category or tag (3) The rule has to be active.
I assigned an element, but I see the element content and the post content on top of each other.
- Solution: Make sure you selected a post element, not a neutral (code) element. Only the Post element removes the underlying content part of the targeted post(s).
The colors in the element don’t work
- The element functionality is not a native theme template, the element is not even a part of the template or page; it’s injected. So theme variables from your color-palet usually have no value at all.
- Solution: Set real colors like #0047AB, not variables.
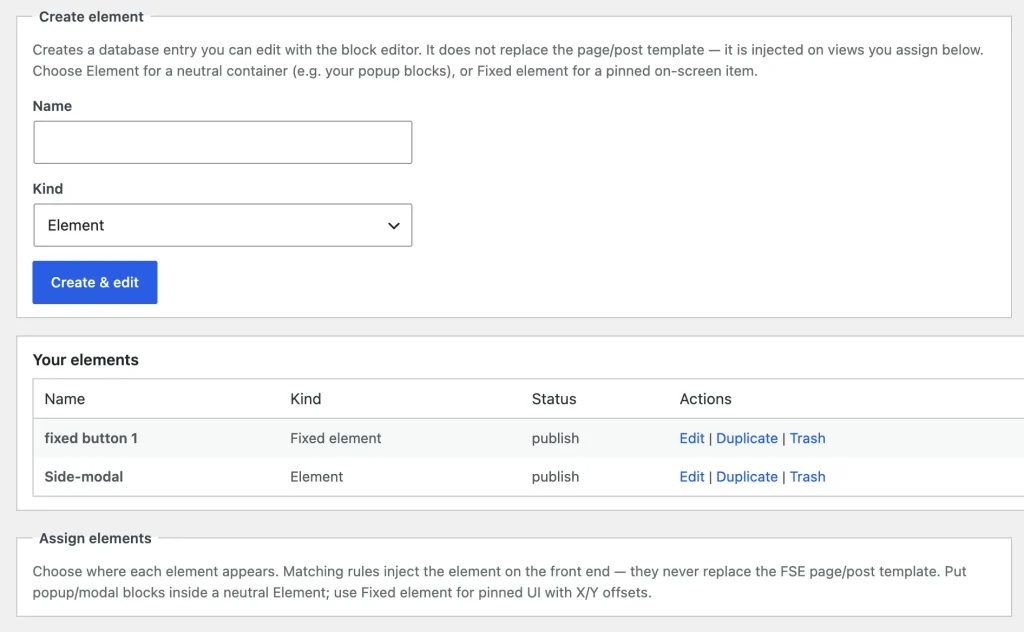
Elements and fixed (floating) elements
- Create and edit elements.
- Template-like elements that don’t replace your page template.
- Assign to post type, specific posts, by category, tag, etc.
- Use them to have site-wide pop-ups, side-modals, forms, floating buttons, etc.
- Fixed elements with x and y settings.
- Show after a set time in ms.
- Visibility per device (show/hide).
- This functionality is classic theme compatible.
- Elements are accessible in the admin menu for editing, just like all other post types.
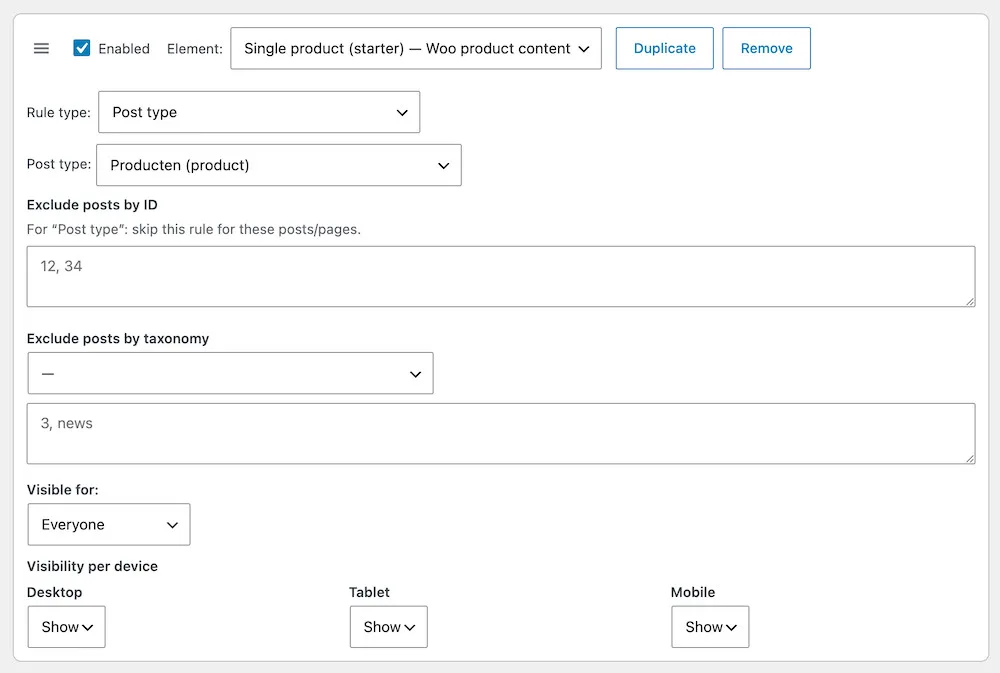
WooCommerce (product template) element
- Create and edit a WooCommerce product element.
- Being able to create the design you want.
- Assign it to all products or specific products.
- Assign it dynamically based on category or tag.
- Visibility per device (show/hide).
- We provide a default ‘starter’ WooCommerce product element.
- This functionality is created for classic themes (full site editing already has editable WooCommerce templates).
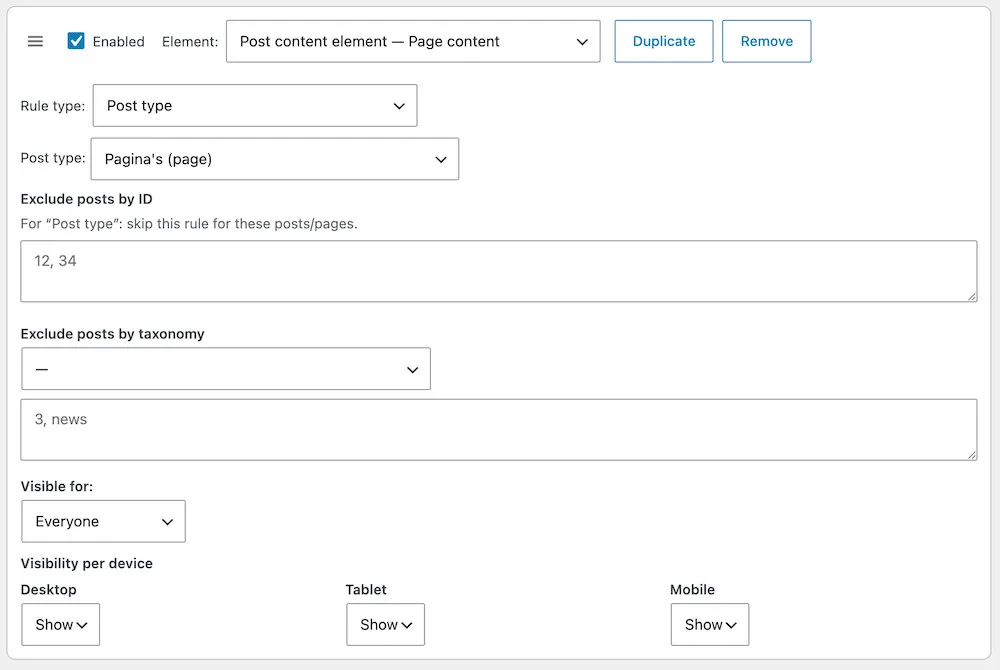
Post content Elements
- Create and edit post content elements.
- Posts, pages, and custom post types.
- Template-like elements that replace the content part of the targeted posts.
- Assign to post type, specific posts, by category, tag, etc.
- Visibility per device (show/hide).
- This functionality is Classic and FSE theme compatible.
- Elements are accessible in the admin menu for editing, just like all other post types.
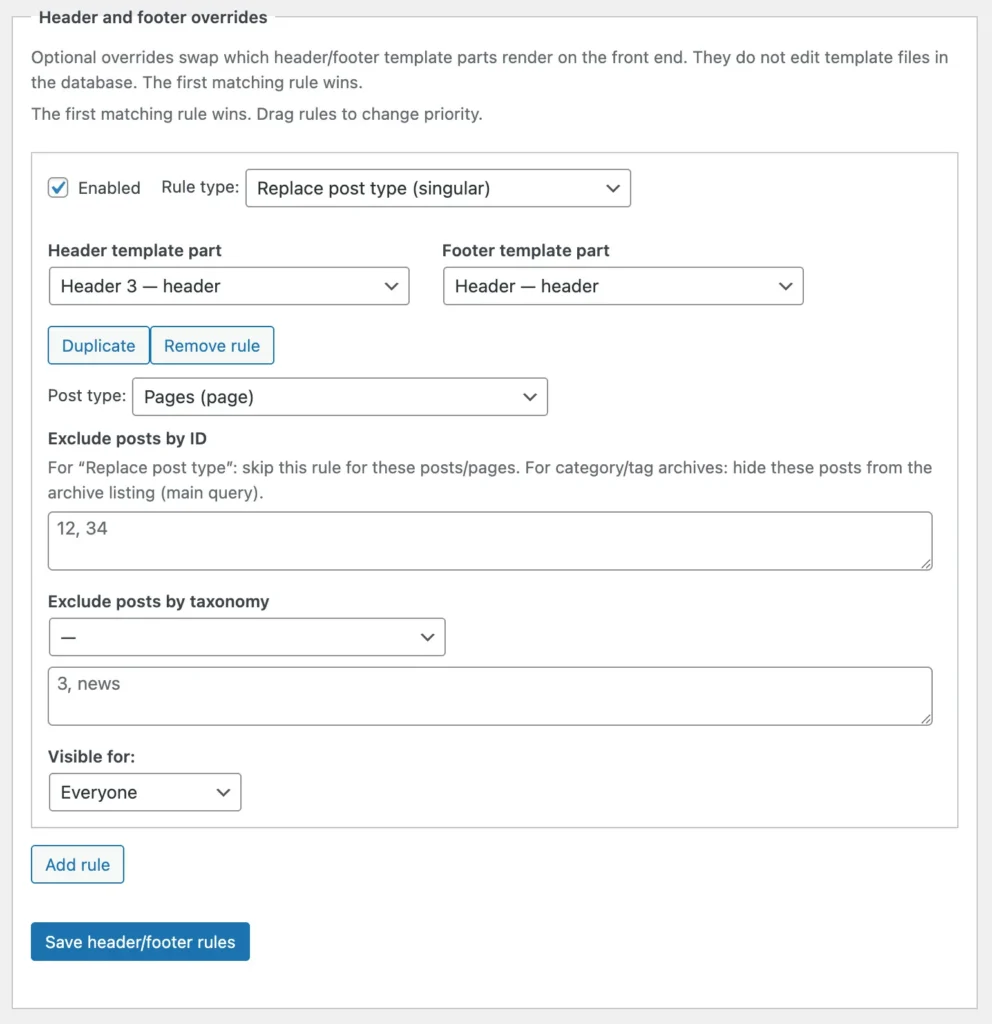
Assign headers and footers
Headers and footers are assigned dynamically, meaning they are not simply replaced but instead rendered based on your selection. The ability to assign headers and footers relies entirely on the core functionality of WordPress. Although most Full Site Editing (FSE) themes adhere to these guidelines and are well-structured, there are some exceptions to be aware of. This functionality is for FSE-themes only.
- WordPress admin, go to Appearance → FSE Template Rules → tab Headers and Footers.
- Create your first rule.
- You can delete any rule or duplicate it.
- Excluding posts is always by ID, not by title or slug.
- For taxonomy exclusions, select a taxonomy (e.g. categories or tags), then a term—by ID or slug.
- Visibility defaults to everyone; you can limit rules to logged-in or logged-out users only. Note: If you are logged in as an administrator, logged-in versus logged-out visibility may not behave as on the front end for your account; otherwise, you could lock yourself out of seeing your content.
- Save when done.
Export and Import
Export and import functionality is available for FSE templates, template parts, headers, footers, and elements. The file format is JSON (universal). You can use this for backups or to exchange templates, template parts, headers, footers and elements between sites.
How to export and import
- Elements can be exported and imported in 2 locations: Admin menu / Elements. or settings / elements tab.
- FSE templates and template parts can be exported and imported at settings / Copy FSE templates tab.
- Headers and Footers can be exported and imported at settings / Headers and Footers tab.
Assignment rules cannot be exported or imported. This is because those rules are based on specific page IDs, categories, tags, and post types. Since these often vary from site to site, errors would occur.
Export and import – compatibilty of content
When you export a template, template part, header, footer, or element, all content is included, including the placement and settings of the blocks. For example, if you use Greenshift or GenerateBlocks blocks in an exported file and then import it onto another website, those same blocks must be present there as well; otherwise, display errors will occur when the template or element is rendered.
Vertical text
We’ve added something extra: vertical text. Most themes don’t support vertical text for standard Gutenberg blocks. And if they do, only one variation; top to bottom. We support both the international variant (top-to-bottom) and the Western European variant (bottom-to-top). At settings you can also choose to apply this CSS and the classes site-wide.
Class to use:
- Vertical text top to bottom (international way) topdown.
- Vertical text bottom to top (West-European way) downtop.
Top-to-Bottom: This orientation is widely considered the best practice for Western languages because it aligns with standard reading patterns.
Why Top-to-Bottom is Better: Natural Reading Gravity: Western users read left-to-right and top-to-bottom. When they tilt their heads slightly to read vertical text, tilting to the right (clockwise) feels more natural.
Book Spine Standard: In the US and many Western countries, book titles on spines are printed top-to-bottom. People are already trained to read vertical text this way. Visual Flow: Reading top-to-bottom guides the user’s eyes down the page, which aligns with how people naturally scroll through a website.
When to Use Bottom-to-Top: The only major exception is Bottom-to-Top (rotated 90 degrees counter-clockwise), which is the standard for book spines in many parts of Continental Europe (like Germany and France). However, for international websites and digital interfaces, top-to-bottom remains the preferred choice for maximum usability.
Personal note: I am the co-author of several book titles. The books have been published in multiple languages. All the spine titles are top to bottom, except the German translation; that is bottom to top. Websites are no different.
What happens in the background after an FSE template rule?
Template Rule
- After you save, the single-post template stored on each affected post is updated. If rules conflict, the first matching rule by priority (top to bottom) wins. When you edit one of those posts, the assigned template name appears there and you can open it from the editor.
- Assignments for the home page, archives, and taxonomy-based rules are dynamic: they are saved as rules, not written into each post’s template field in the same way.
- Rules for headers and footers are totally dynamic. The header or footer you set is displayed at the moment of presentation to the visitor.
- Even if you have assigned a custom page template to a post, the assigned header or footer takes priority!
Restore the default template
- If you want to restore the default template in a single post (page, post, product, or custom post type), and you were to remove the FSE template rule you had previously set, that post would not have the default template back. That is because the plugin actually set it in the database.
There are two equally effective ways to restore the defaults
- Open the relevant post or page in Editing mode, click on Template, and choose ‘Set default template‘.
- Adjust the FSE template rule by selecting the default template and clicking Save.
And the default template will be set again for that post(s).
Conflicting Rules
Examples
- Assigning different templates to the same post ID.
- When you assign a template to a specific category and another template to a particular tag, you may encounter a situation where both the category and the tag apply to the same post. This creates a challenge because WordPress cannot display two templates simultaneously on a single post.
How it works with conflicting rules
- If conflicting rules occur, only one template applies; conflict is resolved by rule order.
- The priority works from top-to-bottom.
- You can make practical use of this top-to-bottom priority: you assign a template to numerous posts, and one rule lower, you assign a different template to the same posts; the top one rules.
- If you want to apply the second (ignored) rule you move it up.
- You assigned an FSE template to a post and assigned a header to that same post: the template assignment will be honored first, then the header assigned will override the header part only; no issue at all.
Deactivating the Dynamic Templates & Elements plugin
- Your templates and template parts are unchanged.
- Template choices already written to posts stay in the database.
- Category, tag, and other term-based template rules are dynamic and stop applying when the plugin is deactivated, so the theme’s defaults apply again.
- Header and footer assignment rules are also dynamic and stop applying after deactivation.
- Elements are lost; they are dynamically assigned.
- Always deactivate a license on an unused website; otherwise, your key slot remains occupied.
Replace or move a license
- Use a license key on another site: open License key on the old site and click Deactivate license on this site, then activate the same key on the new site.
- Always deactivate a license on an unused website; otherwise your key slot remains occupied.
- Replace the key on the same site: enter the new key and save. The old activation on this site is replaced.
Support & bugs
- Our plugins have been extensively tested, have simple settings, and are easy to use.
- We provide basic support for a paid plugin. We are unable to explain the basics of WordPress, like template creation or custom fields.
- Found a bug despite our best efforts? I would appreciate a report at https://server.wpinsight.eu/support/
- You can check the free slots of your license at: https://server.wpinsight.eu/validate-key/
- Are you happy with the plugin? Spread the word!
Plugin details
- https://wpinsight.eu/fse-template-assigner-plugin/
- Copyright WPinsight – Bas Buis
- https://wpinsight.eu